Ambra hair coloring - This is a combination of highlighting and toning methods using different shades. For the first time, Hollywood stars such as Jennifer Lopez, Rihanna, Drew Barrymore began to use the ombre style. After this fashion has spread around the world.
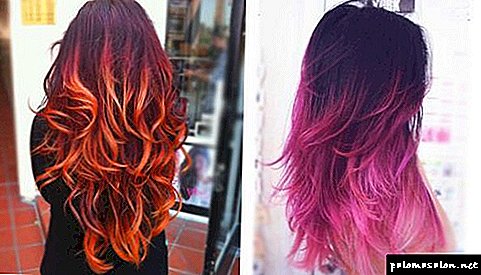
Ombre hair coloring is a fashionable trend in the modern world. The word ombre was borrowed from French, which means "darkened" or "with a shadow." The result of this color is similar to hair that has burnt out in the sun. Ombre hair coloring is light ends with a gradual or abrupt transition to dark roots. The tips are usually brightened to eight tones, the hair in the middle is up to four tones, and the roots are given a darker tone. If your hair is rather dark, then it remains intact. At the same time it is necessary to create a contrast with the light ends of the strands.
In turn, the classification by the number of ombre tones is:
- Coloring with two tones is called shatush. The main difference from the classical method of dyeing is that in the place where the hair is dyed a clear, precise line is obtained.
- Degrad - stretching flowers. In this case, the coloring gives the impression of naturally burnt hair. Most often, this technique is dyed dark hair. At the end of the coloring, a gradient transition is obtained, and at the ends - the brightest tone.
- Shadow painting also uses two tones of different colors. For example, if native hair is rather dark, then light areas can be dyed, for example, in red, green, yellow tones.
- If the coloring is done not on the tips, but on the roots, then this is called the opposite ombre.
There is also an ombre division into short, medium and long hair. The effect of balayazh is best achieved on short hair.
Balayazh and Californian melirovanie involves stretching the dye to the entire length of the hair to the roots, and if the dye is used only to the middle of the strands, it will already be Ombre.
Along the height, they produce a long (indent from the roots no more than 4 cm) and a short (only the tips) coloring.
Dyeing technique for dark hair
initially Ombre hair dyeing technique was created for dark hair, because it is on the dark strands that all the beauty of the gradient of colors is transmitted. To date, the masters have learned to brighten hair to very light shades, which allows you to use the ombre technique for blondes.
For girls with dark medium and long curls in salons, staining takes place as follows:
- For the effect of the most natural curls, the master divides all the strands into several parts. Thus, a peculiar rhombus is obtained from the top of the strands.
- Then this “rhombus” master collects in the tail and no longer touches them in the process of staining. Then the combing of the curls to the maximum light point occurs. Then the comb is made.
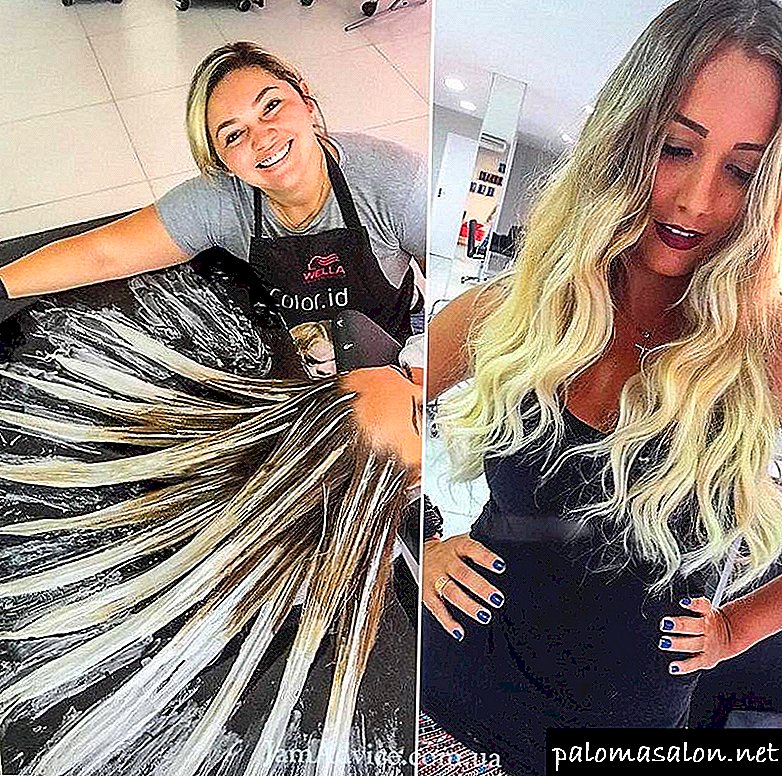
- After the strands are combed, the coloring itself begins. This stage should be carried out gradually, in several steps. This is especially true for dark hair, they use more dye. When the amount of paint is determined, it is applied with a brush over the entire surface of the strands.
Professional hairdressers use special powders when coloring ombra. But at the same time the ends of the hair are severely damaged. Therefore, it is better to work with professional cosmetics, in which the concentration of chemicals is much less.
After achieving the desired result, all painted means are washed away and styling is done.
This technology is used on wavy hair.For blond hair, you must use a choice of dye or tonic.
Method of dyeing blond hair at home
If you decide to make an ombre at home, then this will significantly reduce the cost of painting. Therefore, if you want to save money, then this particular technique can be performed at home.
To do this, you should have: directly the paint itself, a brush for applying it, a non-metallic container (if you need to mix several shades), a comb for distributing paint, foil or food film, non-metallic clips.
Consider the rules of coloring, if you are the owner of a cascade hairstyle or caret.
- All hair must be collected high in the tail. If desired, the tail may be closer to the back of the head or at the crown.
- The next stage is combing. If you have straight curls, then there is no difference what brush is used, but if you are the owner of curly hair, then use a comb made of wool - it will bring little harm to your hair.
- The paint is mixed just before the application itself, because it quickly loses its properties. Withstand the paint on average from half an hour to 45 minutes, depending on the result to be obtained.
- After that, the tail is wrapped with foil or cling film. You also need to know that the ombra is not wrapped with anything, but if the hair is not very long, then you need to cover the tail to avoid staining the rest of the areas.
- If there is a bang, then it is not necessary to paint
- After the expiration of time, the composition is washed off. There are also certain stages here: an air conditioner is first applied so that the hair does not get tangled, comb them. After that apply shampoo and mask. In their composition should not be oils, otherwise there will be a shading of ombre.
- Due to combing, the border between natural and colored areas will be smooth, with no clear boundaries.
Specificity short hair coloring
For short hairstyles, such as bob-caret, page there are features when coloring. Each strand should be dyed as when highlighting, but the foil is not used.
- In order to avoid complete discoloration, it is necessary to start coloring, stepping back from the roots of at least 1 centimeter.
- In this case, no bouffant needed - the effect of the gradient is obtained through a combination of your own and colored strands.
- There is no particular coloring scheme in this case, it all depends on the length of the haircut and the color. With completely identical data, you can use different techniques.
For a good result after dyeing it is better to use only professional paint. The cost of painting on short hair without consumables is about 2000 rubles. If the result is not satisfied, then you can always use the wash. She is natural or professional.
When choosing a tinting agent, you need to know that permanent dyes are kept for about 6 weeks, and semi-permanent ones are washed off about 5 times.
Each type of dye has both advantages and disadvantages. Permanent dyes difficult to withdraw. For some, it will be worth - the color will last a long time, less often you will have to dye your hair. But at the same time, if the result does not suit you, it will be difficult to withdraw it.
There is a drawback to temporary dyes. - If the painting fall under the rain, you can stain the clothes. In this case, you can often change the shade, the old is easily washed off.
In the end I would like to recommend to contact the professionals for the high-quality implementation of the ombr technique.
Pros and cons of such staining
When choosing this type of dyeing for long dark hair, you need to take into account certain nuances inherent in this technique, which has both advantages and disadvantages.
Advantages of ombre:
- you do not want to spoil your hair with full coloring, but you want to change the image, then the ombre will fit perfectly,
- minimal damage to curls - the paint is applied only on the lower part of the hair,
- There is an opportunity to choose the coloring composition as close as possible to the natural color - then the hairstyle will look very natural,
- It is possible to perform amber on any dark hair color, be it natural or dyed,
- suitable for women and girls of all ages
- used on any length of hair, except for ultrashort haircuts,
- thin and rare strands gives visual volume and density,
- the technique will give a long-lasting effect, visit a hairdresser-colourist, even strongly regrown hair look very impressive, as the paint is applied only on the ends,
- With this staining, you can visually correct the shape of the face, simply select the desired shade that will be applied to the strands around the face,
- if the result from the use of ombre is unsatisfactory, you can simply cut the tips, or paint over a darker shade,
- ideal for haircuts with bangs of any length.
Disadvantages:
- Pigmentation of dark hair is very strong and persistent, not the same as in light curls. Therefore, in order for the coloring to be effective, it will be necessary to apply bleaching, and it may be necessary to have more than one session.
- Not suitable for short curls.
- On split and brittle tips staining is not carried out.
- Sometimes it is difficult to achieve a smooth transition.
- High price.
As you can see, the ombra have many more minuses, and if you wish, some minuses can be eliminated, for example, short curls can be grown, and split ends can be trimmed.
How to choose a color?
Important! Before you choose a particular shade, you need to consider not only the skin color, but also the shape of the face.
Colorists focus on the selection of colors on the shape of the face:
 if the face is oval or round, then it can be lengthened using light shades on the curls that are in close proximity to it,
- To representatives with a diamond shape, on the contrary dark shades will suit the face,
- the shape of the triangle will visually correct the warm colors and shades,
- trapezius face corrects the light shade of the roots.
 if the face is oval or round, then it can be lengthened using light shades on the curls that are in close proximity to it,
Besides, when choosing a color for long dark hair, one should take into account the color of the skinwhich thus decided to change its image. If the color shades are chosen incorrectly, the skin can lose its natural luster or even change the color gamut of the skin. This can not only worsen the appearance, but also visually add age. So:
- Skin color is pink or bluish, the main color should be applied dark brown, light or red, and the additional color will be honey, golden or ashy.
- Owners of red skin tone for the base color you need to take golden or honey brown, and the auxiliary will be caramel.
- Yellowish skin helps to fix the mahogany, golden chestnut, dark chocolate, or chestnut primary colors, take dark copper, cinnamon or burgundy as an extra.
But this is only an approximate use of colors, as ombre includes a large variety of combinations of shades and types.
Brightening the tips of the hair or how to look beautiful in Hollywood


To look stylish and spectacular, it is not necessary to completely repaint the hair. Radical methods can replace the brightening of the ends of the hair or even individual strands. This solution has a lot of advantages: minimally harms the hairs, does not require regular renewal of color and looks fashionable.
World celebrities successfully perceived and adopted bright trends. This applies to Ukrainian singer Ani Lorak with ombre technique on her hair, famous foreign stars Katy Perry and Britney Spears with bright strands, Russian singer Nyusha and American actress Kate Bosworth with cardinal shades of the tips.
How will look on different hairstyles?
The ombre technique is universal and looks good on hair with any haircut:
- If a woman has a haircut with a bang, then there may be several options for coloring. One of the most popular is a slight deviation from the roots, 10 cm and stretching the paint to the ends without a visible transition, while the bangs are also slightly colored. But you can not paint the bangs, if you retreat from the roots of a greater distance.
- The haircut cascade, painted using the ombra technique, looks very beautiful, the curls elegantly fall on the shoulders, while the hairstyle looks spectacular and as natural as possible.
- If the hairstyle is made in the form of a ladder, then you can use an ombra with a contrasting transition.
- Especially beautiful looks such staining on wavy curls, she begins to play intricate modulations and bright highlights.
Before and after pictures
Then you can see the photo before and after painting using the ombra technique on long black hair:


Technique of
There is a certain technology of similar coloring which is applied by professionals:
- Colorist divides the curls by zones.
- On top of the rhombus stands out from the hair.
- Further, the curls on the crown are collected in the tail, which in the process of work will not be affected yet.
- The remaining hair strongly combes out, for the best effect it is better to use a brush made of natural lint.
- As soon as all the curls are combed, the primary coloring begins.
It should be said that the coloring will take place in several stages, it all depends on the source color. If the curls are very dark in color, then you first need to "wash off" the main color, and then paint. As soon as the desired color is obtained, all coloring compositions are washed off, and the hair is placed in the hair.
There are so many types of ombre dyeing that look impressive and natural in a hairstyle. Which one of them to rip depends on the source color and the desired effect. Consider the most common technology.
Multitonal
This is a method of transverse coloring, it has many advantages:
- the transition is smooth, using several shades,
- curls look as natural as possible
- if you entrust staining to a professional, you can achieve a rhombic effect.
Among the shortcomings, it can be noted that only the high cost and the inability to perform dyeing on their own.

Dyutonal
This is a traditional staining method with a clear or fuzzy horizontal line. Only two colors are used, the horses have a natural color, and the ends are painted in a lighter shade. Another option also looks impressive when the curls from the roots are colored in a light tone, and the ends leave a dark, natural shade.
Of course you can apply any color staining, but The most popular are natural shades:
- chocolate,
- beige,
- coffee,
- Blonde
- honey,
- copper and so on.

Monochrome Ombre
This type of coloring involves the use of two contrasting colors. Seen from a distance, a monochrome ombre looks like a striking geometric pattern. Before you decide on such a transformation, you should think carefully, there are only two colors in this ombre - black and white. The hairstyle looks very noble and elegant, but this type of coloring is not suitable for everyone.

Scandinavian
This type of staining involves highlighting the roots, which will smoothly turn into darker color tips. Sometimes the ends are colored in color shades, which gives the hairstyle a special charm..

What shades can be used for colored ombre on dark hair:
- dark roots remain unchanged, and the ends are painted in bright purple color,
- dark base color gradually turns into a rich blue, which in turn ends with gray tips,
- a combination of its chocolate color and raspberry tone,
- bright brown hair at the roots with the transition to pink.

Hair coloring - a short hair care excursion
Literally 15 years ago, most girls knew only two types of staining: plain and highlighting.But now there are many more varieties, and the girls are already confused with the names of the types of hair coloring. Photos in glossy editions attract the successful results of multi-staining, and you really want to try it out for yourself. So how is balayazh different from highlighting, and shatush from ombre?
 Hair coloring - a short excursion to hair care on ProdMake.ru
Toning
This is a one-tone coloring, that is, a familiar coloring to everyone. After toning all hair evenly dyed in one color. With such a technique, there are no transitions, no gradations, no mixing of shades on the hair. But the color can be mixed from several tubes with different shades to achieve the necessary.
One of the new types of hair coloring, in which the roots have a much darker color than at the ends. At its core, this technique is close to highlighting, but with it it is not the strands that are lightened, but a gradient along the length of the hair. The darker color at the roots to the tips is getting lighter and lighter. According to the rules, the transition should be smooth, the result should not resemble the grown dark roots of a brunette, who is painted in a blonde.
Of all types of hair coloring shatush looks the most natural. Not everyone will even guess that the hair is colored. At its core, shatush is similar to highlighting, it is also the clarification of strands and their further toning. But using shades close to the natural hair color, gentle compositions.
Perhaps the most fashionable type of hair dye - balayazh. This is a gentle and natural option ombre. Balayage is a French word and translates as “sweeping.” As with the ombre, the goal is to make a gradient from dark at the roots to light at the tips. But shades are used natural and different from the natural color of hair no more than 3 tones.
Coloring
In 2016, a new trend started - colored hair. Girls, regardless of style and age, began to dye their hair in fancy colors such as blue, pink and even purple. Previously, only young fans of rock culture and cosplay were so fond of this. With proper combination with clothes, makeup and beautiful styling it looks pretty fabulous and magical. Few people want to go like that all their lives, but when to try something like this, not at the height of the trend.
Blonding
This is the classic repainting of the blonde, that is, a cardinal lightening, without any transitions. Constant blonding is not a cheap pleasure, but for some girls it just transforms. The most desirable for girls who decide to become blondes is a cold Scandinavian blonde. But it is the hardest thing to do, since most girls have red pigment in their hair, which is very difficult to etch. Therefore, for inept masters, the blonding is obtained with a yellow tinge.
10 tips on how to keep salon results as long as possible
Here are some tips on how to maintain the result of new types of hair dye as long as possible:
- Use detergents for dyed hair, this is not an advertising move, they really wash out the paint less.
- Do not neglect the conditioner, it seals the pigment.
- Wash your hair with cool water.
- In order to avoid a yellow shade in the hair, after washing and before applying the balms, apply a purple shading shampoo for 10 minutes.
- Do not use oils in hair care, as they wash out the paint.
- Avoid direct exposure to sunlight and tanning beds, ultraviolet will ruin the salon result.
- After visiting the salon, try not to wash your hair for 2 days to fix the paint.
- As rarely as possible, wash your hair if it quickly becomes greasy, that is, it makes sense to make friends with dry shampoos.
- Sauna and swimming pool harm hair color, so either avoid visiting them or protect hair with a towel and a hat.
- Try to visit a proven master at least once every 2-3 weeks, and then the result will always be the same. -
DIY Ombre: Tricks and Hair Coloring Techniques
Oddly enough, there is no generally accepted ombre dyeing technology, especially when it comes to ombre dyeing at home. Quickly, does not mean quality, but the ombre technique has its own nuances!
For example, as seen in the photo, the beautiful Ani Lorak prefers a complex ombre (multi-stage color coloring) —the selection of strands, while at different levels — such an experiment can be freely performed at home without resorting to the services of a stylist.

Ombre Hair Coloring Preparation
For a start it is worth arming with the necessary means:
- dyeing gloves
- non-metallic container for paint clarifier,
- brush and comb,
- foil (if you need a more saturated color transition),
- rezinochki for hair and "protective" coating (to keep your skin and clothing).
So, we are ready to do the coloring using the ombra technique on natural hair color, this reservation is important, since several colors will not be used, and only one - brightening strands.
At the same time, without starting to dye, you need to decide what color it is preferable to see on the hair as a result: if you do not want to hurt the ends, you can not use an oxidizer, but then you get the effect of sun-burnt or red hair (depending on the color of the paint ).
If you still want to "bleach" curls, turn to the subtleties of color:
- Before splitting, cut the split ends so that the hairstyle will subsequently have a neat finish.
- The powder and oxidizer are diluted one to two.
- When choosing an oxidizer, we take into account: the lower the percentage, the higher the "whitening". It is better to take the optimal 3% and wait a while, than to take 12% and destroy your hair.

Ombre technique for natural hair color. Home is best
Why is it better? Finally, feel yourself a master and make an ombre at home, and you will feel: everything is in your hands (and even significant savings from visiting a stylist). It is best to keep your hair and ombre on unwashed (about 2 days) hair. At the same time, divide them into sectors. And here the most interesting begins:
Proponents of rapid ombre methods at home produce staining method sequential application on each strand of lightening paint from the area around the chin to the tips, as in the photo with a comb. The front strands stand higher to emphasize the face.
In this case, the hair is not wrapped in "candy wrappers", as it requires a weightless color transition.

For lovers of a more saturated color transition, you can use another express method also without division into segments, but with foil - to achieve a brighter shade at the tips. In addition, each strand is coated with a brush and the future “candy” is wrapped, which is aged 25-30 minutes. This method is available video outlines:
Reviews related to both of the rapid methods and the most different: someone is suitable, someone is not. Therefore, you should pay attention to the ombra with a pile, which helps to achieve a smooth transition without tinting and additional time wasting.
By the way, this type of ombre is called shatush: at present, there are many ombre derivatives - and brondirovanie, and white, and degradade - experts agree on one thing: these are only derivatives, since if we are talking about significant differences in technology, no one counted the techniques for performing ombra.

The photo shows this technique of execution, but we will look at it in more detail:
- To begin with, we will prepare a mixture: a powder and an oxidizer, on hair of medium length, as a rule, two tablespoons of powder and four oxidizers are enough. Stir the mass thoroughly.
- We divide the center part over the entire head, the back hair is removed with a hairpin.The front strands are separated from the ear horizontally. We pin the upper curls and start painting from the lower ones.
- We make a pile to ensure that the transition on the strands is smooth and natural. And from the desired height we begin to paint the hair with a brush.
- We wrap up the "candy wrapper" and take up the remaining strands, doing the same work. This video perfectly demonstrates how to make an ombre at home:
With the use of a fleece, the professionals work, and looking at the following video, you will be able to observe the same technique that we conducted at home without much difficulty:
But if you have a fear of combing, and nevertheless you want to achieve smoothness of the lines, you can calmly comb replace pigtails. Yes, by braiding the pigtails, you will achieve the same result without injuring your hair, and the whole difference is that the split locks do not comb your hair, but braid into mini-pigtails up to the required level. By the way, the reviews to this method are the most positive!
Color ombre - brightness is always in fashion
If recently it was commonplace that the bright strands are the lot of adolescents, their way of self-expression during the transition period, now quite adult women use this way of self-expression, because this is a trend!
Color ombra in this context can also be simple, just to highlight hair strands or tipsAnd as we see in the photo, it looks very elegant!

It is worth noting that it was from blondes that the Ombre colors began to be popularized, but now brunettes are finding bright accents for themselves, which undoubtedly help to stand out from the crowd.

But since the color staining tends to quickly bother, you can resort to crayons or powder for hair, this colored ombre is kept for a short time, but it also opens up a huge field for experimentation. Applying it is not difficult, as seen in the photo above, but it also resembles in color and brightness of colors to any particular case than to everyday life.

Another question - staining for a long period. Here women of fashion give preference. tinting means, they are less harmful to hair than dye, and last a rather long period of time (a month or even more). At the same time, exceptional reviews are given to the toning agent with the same name “Tonic”, let's take a closer look at the technique:
- Color ombre for a bright result is applied to pre-bleached hair.
- Take care of the coating on the neck and clothes, as the tonic is rather caustic, and it will not be easy to wipe the clothes and skin.
- We divide the hair into four equal tails: two in front and two behind and fasten rezinochki at the level at which I would like to see the result.
- We mix colors of tonics with balm (for more gentle effect). If we want to see passing colors, then it is better to choose the effect on some strands in advance: the most popular and expressive colors - blue, blue, purple or lilac to pink.
- We begin the gradual application of tonics: first, the color base (you can do it with a brush, but with gloved hands somehow need to work to evenly distribute the paint on the hair), and then the color-continuation.

In this case, the foil can not be used if you are blonde, but if you are a brunette and decided not to go too far away from the color, you can try the cherry version, which in itself looks no less attractive, and, looking at the reviews, it is used by the girls pretty often, video steps:
Editorial Board
If you want to improve the condition of your hair, special attention should be paid to shampoos that you use.
A frightening figure - in 97% of shampoos of famous brands are substances that poison our body. The main components, due to which all the troubles on the labels are designated as sodium lauryl sulfate, sodium laureth sulfate, coco sulfate.These chemicals destroy the structure of the hair, the hair becomes brittle, lose elasticity and strength, the color fades. But the worst thing is that this stuff gets into the liver, heart, lungs, accumulates in the organs and can cause cancer.
We advise you to abandon the use of funds in which these substances are located. Recently, experts of our editorial staff conducted an analysis of sulfate-free shampoos, where the first place was taken by funds from the company Mulsan Cosmetic. The only manufacturer of all-natural cosmetics. All products are manufactured under strict quality control and certification systems.
We recommend to visit the official online store mulsan.ru. If you doubt the naturalness of your cosmetics, check the expiration date, it should not exceed one year of storage.
Ombre is not only hair
Perfect manicure - after the hairstyle of the second sign moment for a well-groomed girl. The ultra fashionable ombre season touched and marigold. With that, as touched! There are a lot of variations on the theme: french-ombre, gradient of glitters, vertical and horizontal ombre, blackout at the base of the marigold - in general, fantasy has gone to paradise!

But I always want to be beautiful, and the girls dare to "do it yourself with a mustache" and for good reason! You will not need any feedback or training - to make such a unique ombre manicure at home is easier than ever:
- To do this, you need baking paper, foil or file, a sponge or foam rubber, toothpicks and two or more types of varnish, one as a base.
- Apply the base prepared on the manicure of the marigold, lubricate the area around the marigold with a cream so that you can easily erase any flaws.
- Then pour over each varnish overlapping file and carefully make the transition from one color to another with a toothpick.
- Dip a sponge in varnishes and stamp it on the nail.
- Clean the nail from the "flaws" and cover fixer. Voila!

Variations that are possible with sparkles and flowers - the flight of your imagination! Video to help recreate the ombré effect on your fingers:
Fashion is open to those who like to experiment and amaze: so, go for it! Use the ultra-fashionable ombre and in clothes, and on the hair, and on the nails - this will help emphasize your personality and unique style!
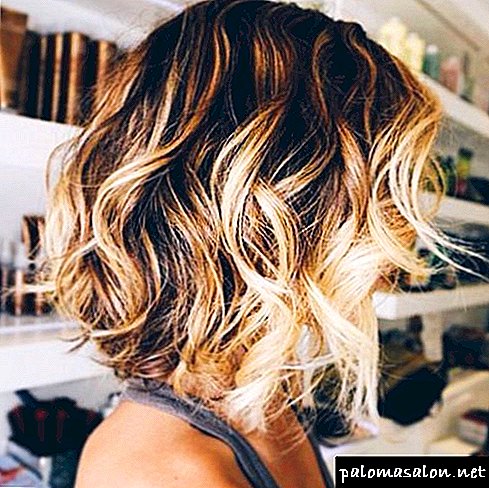
Dark or black hair
Ombre on the hair of dark shades looks especially advantageous - the clarified ends create a bright contrast and make the hairstyle visually more voluminous. For a soft, natural transition you should pay attention to the paint of warm natural shades: honey, wheat, light brown, amber. For a more extravagant and vivid image, you can use ashy blond, as well as dyes of bright colors: turquoise, red, blue and purple, but for this you first need to completely brighten the ends of the hair.

Blonde hair
Ombre on blondes can also look very natural and organic, the main thing is to make a neat, smooth transition from light to dark. To do this, you can choose the paint of several shades, from dark-blond to chocolate. Owners of ashen white curls can complete the coloring with black tips, thereby ensuring an unforgettable image. Peach and pink shade also looks very beautiful on blond hair.

Preparation and staining steps
Once the desired shade of paint is selected, you can proceed directly to the staining.
To make home at home we need the following materials:
- quality clarifier
- hair dye
- ceramic, glass or plastic container
- oxidizing agent
- coloring brush
- comb with a thin tip for easy separation of the strands
- gloves
- foil (for a sharp transition from one color to another)

It is important to remember that paint dries to clean hair much worse, and the risk of damaging their structure during lightening increases, so you should not wash your hair at least a day or two before the procedure. Before applying the paint hair must be carefully combed.
Coloring is performed in several stages:

- First mix paint and oxidizer.
- Decide where to start the transition to a new color. Long-haired girls are better to start lightening at the level of the chin, and girls with short hair near the cheekbones. Thus, blond hair will visually lengthen the face and make it more narrow.
- Begin coloring with the tips or middle of the hair, depending on which part you want to make brighter. Apply the paint several centimeters in a gentle downward motion.
- Wait half an hour.
- Now apply the paint to the rest of the hair.
- Hold it for no more than 10 minutes.
- Rinse thoroughly with a shampoo and apply colored hair balm.

We perform staining at home no worse than in a hairdressing salon: creating a smooth transition on long and short hair
In order to get a natural, soft ombre, you need to hold the brush vertically and control the amount of dye that brightens the hair. As a rule, most of all is applied on the tips and towards the roots the amount of paint decreases. The last layer, separating bleached hair from natural, should be as soft as possible. Keep the paint on this site need quite a bit. This will allow the dark shade to smoothly turn into a blond and create a natural play of color.

Creating a sharp contrast on the hair
In this staining technique, the paint brush moves horizontally. This will create a clear boundary between light and dark hair, without smooth transitions. The paint in this case is held on the entire length to be painted the same. But no more than the time specified in the instructions.
Horizontal coloring is one of the most interesting and extraordinary techniques of creating an ombre.
 Choose your ombre and be beautiful
Care for dyed hair at home
As you know, even the most gentle clarification of the tips of the hair harms their structure. After dyeing, the happy owner of a fashionable ombre will notice that the hair has become drier, fluffy or brittle - this is due to the stratification of the hair cuticle. However, proper care and caring for the hair will help smooth the scales of the hairs, again making them smooth and shiny.
To restore hair after lightening, you should use moisturizing shampoos, as well as nourishing balms and masks, which include vegetable proteins, amino acids and keratin. But with oils it is better to be careful - bright colors are very easily washed off with oil. Of course, all curling and ironing is better to postpone for some time, along with styling tools. Instead, they can give hair smoothness indelible conditioners and serum.
What is an ombre?
The latest fashionable trend in the field of dyeing strands can be called ombre on the hair. The variety of hairstyles that can be created with the help of this technique is limited only by the boldness and extravagance of the hostess.
The popularity of ombre coloring encompassed both representatives of creative professions and ordinary women who keep up with the times and fashion. Wide use ombre for light hair and dark hair got because it suits women of any appearance.
So, ombra is a two-tone coloring of the hair strands along their entire length. In this case, the transition boundary of one color to another can be at any length, but most often is located closer to the tips. This approach helps to avoid the effect of regrowth of dyed hair.
- In classical varieties, the ombre staining suggests that the difference between the shades used is no more than two tones.
- This hairstyle is valued for its natural appearance, while it has its own highlight in comparison with a similar variant of dyeing in one color.
- As the main tone can be taken natural hair color. Then it is not necessary to dye the root part of the hair, it is enough to choose a suitable color for the tips and perform a transformation procedure.

Ombre staining at home
In order to make an ombre on the hair, it is not necessary to go to a beauty salon or a hairdresser. It is enough to acquire all the necessary attributes and start painting at home.
Before starting the coloring using the ombra technique, you should choose the tools and fixtures:
- oxidizer brush
- paint brush
- oxidizing agent
- paint of the chosen shade
- hair cap
- hairpins or elastic bands to separate and secure the strands
- comb and comb
- rubber gloves
- foil
- suitable clothing or cape
- shampoo and balsam conditioner
- terry towel
- paper napkins

- The amount of dye and oxidizer depends on the length and thickness of the hair, as well as on the place of the border of the transition of shades from one to another.
- Brushes, a hair cap and rubber gloves can be disposable. After use, they can be thrown away, making it easier to clean the staining site.
- Terry towel is better to have a separate, used only for dyeing, preferably, light colors. So, blotting your hair, you will immediately understand whether the paint with the strands is completely washed off.
- Paper napkins will help to quickly wipe your hands or clean any surface in case of such need.
Ombre staining: stages
Painting ombra at home can be done independently with the knowledge of the basic nuances of the procedure and following the correct sequence of actions. Suppose you choose the color and length of the ombre you want to achieve.

It's time to do the necessary preparations:
- It is necessary to purchase or pick up from the available items necessary for self-coloring. Make a list and check the availability of all components in advance.
- Decide on a place in the apartment where it will be convenient for you to dye your hair. It should be equipped with a mirror, well lit and ventilated.
- Put on a protective cape or clothing that is not a pity to get dirty. Protect your hands with gloves.
- Comb your hair with a comb. Using a comb, separate the strands of the desired thickness and secure them with elastic bands for hair. The remaining hair can be fastened with a barrette.
- Carefully apply an oxidizer to the hair to lighten the strands. It is necessary to note the desired period of time, information about which is usually on the package or in the instructions for use. The duration of lightening hair usually takes up to half an hour. The resulting effect is better to check for small strands. After the required time has elapsed, the oxidizer should be washed off with a large amount of running water.
- After bleaching, let the hair dry. Next, separate the strands again and apply a dye on them. After applying the paint on each strand wrap it in foil. Then apply the next layer of dye to a level just above the previous layer. Wait a while and apply paint on the tips to secure the effect.
- The final part of the ombra dyeing procedure is washing the hair with shampoo and applying conditioner or balsam-rinse. After that, the hair must be shaped, making styling according to your desire.

Ombre at home: photo
Clients often come to beauty salons and hairdressers, show photos of some hairstyle and ask to do the same.As an example, an ombre can take a photo not only of representatives of the beau monde, but also any image you like.
The only limitation is the similarity of your type of appearance and hair color with the selected standard. If you do not take into account such a nuance, the result of Ombre dyeing on your hair may differ significantly from your expectations.

On the other hand, if you want to create a unique image by yourself, you can start looking for a photo of the ombre variant and recreating it at home.
No need to be afraid to dream and experiment, because in professional beauty salons you can fix almost any errors of hair in case of failure. The only thing that is not worth doing when doing homemade ombra dyeing is to over-oxidize or dye, as this can damage the hair up to the need for substantial cutting of its length.

Read the instructions on the packages before starting the manipulations and follow them to the full.
By adhering to our recommendations, you will gain an updated image without spending a great deal of time and money by creating it yourself, and you can also change your hairstyle with Ombre dyeing as often as you like.
Over time, you will gain invaluable experience in creating hairstyles using the ombra technique at home and, we are sure, this fashionable trend will not leave you indifferent.


Home Paint Ombre: Requirements and Expected Effect
The main thing in the process of preparing for the coloring of ombra - choose paint and brightener. To begin with, we advise you to decide on the shade that you want to give to the area of the tips of the hair.
- If you have dark hair by nature, then the paint for ombra will suit you two colors lighter.
- If you are the owner of hair of light shades, then you better paint the tips with a suitable shade two shades darker. This approach provides two effects at once: on the one hand, as a result you get a more natural hair color, and on the other - a fresh and updated look of your hairstyle.

The main requirement for ombre paint at home is the absence of ammonia in its composition in order to preserve the natural look and not too much damage the internal structure of the hair. This paint is quite capable of coping with the coloring of ombra and at the same time will have a gentle effect on the hair.
As a clarifier, and paint is better to buy a well-known manufacturer, and even better professional. In general, any hair dye will be suitable, only at home it should be handled very carefully in order not to get an effect different from the expected.
How to make an ombre staining: types of procedure
The classical ombre technique involves a combination of strands of lighter tones at the tips with darker ones at the root zone. But the development of this stylistic coloring was the basis for various variations of hairstyles, ranging from creating an ombre effect by lightening individual strands and ending with a multi-colored ombra, when the hairstyle combines the colors of different colors and allows the owner to emphasize her bright style and personality.

So, depending on the length available, an ombre can be performed on short, medium and long hair. According to the original hair color Ombre is distinguished on light and dark hair.
According to the specifics of the result, the following types of this technique are distinguished:
- Classic two-color version with natural roots color
- ombra with staining and root zone, and hair tips
- multitonal ombre
- creating ombre flare along the contour of the haircut
- ombre booking
- contrast ombre
- monochrome ombre
- Scandinavian Ombre
- natural ombre
- colored ombre
- ombre "flames"


It is worth noting that the color and monochrome ombra, as well as the ombre “tongues of flame” are ideal for brunettes, creating highlights in the ombra style along the contour of the haircut, Scandinavian and natural ombra - the owners of light hair. The remaining varieties are applicable to any original hair color.
In any case, the choice is limited only by the wishes of the woman and the features of her appearance, style and lifestyle.

How to make an ombre on short and long hair?
Depending on the length of the hair, which is planned to make an ombre, the choice of the beginning of the coloring line is made.
- The border of the transition of shades can be anywhere, but most often the chin line and the ear line are taken as the basis. That is, on long hair, you can begin coloring from the chin line, reaching the tips of the hair, which is applied to the lightest tone of paint.

- On short strands, the ombre looks stylish in the case of shifting the border of meeting shades to the level of ear placement. Compliance with these simple rules ensures that the total ombre will not resemble just regrown hair roots, and the hairstyle will be spectacular and fashionable.

- Another difference is the time of staining. Of course, ombra for short hair takes less time. But, on the other hand, short hair must be dyed more carefully, since all the irregularities will immediately become noticeable due to the small length of the hair.
- Ombre for long hair will take more time, but a long length makes it possible to create a smoother transition of shades and their harmonious appearance.
How to make an ombre at home: we select the color
In order to choose the color for the ombra, you need to take as a basis your type of appearance, eye color and skin tone. Further it is necessary to familiarize with ombre examples. You can see photos of models whose appearance is similar in color to your own.

The next step will be your imagination in choosing a future hairstyle. Before painting, it will not be superfluous to take into account the peculiarities of your profession and the possible reaction to a change in the image of your loved ones. If you are a creative person and ready to experiment, and there are no such restrictions, then we advise you to rely on your own wishes.
The only thing that I would like to draw attention to: it is better to start experiments with options for staining in more natural shades. This is due to the fact that in such a case it is independently easier to pick up paint in the required color range. It is better to use bright shades after acquisition of some skill and experience of coloring.

When skills are obtained, it is possible to select a “tint pair” to the existing hair color. If you are most attracted Ombre color dyeing technique Nowadays, the most fashionable are shades of honey and wheat colors, as well as a range of red, cherry, lilac and blue color highlights.
How to make an ombre on dark hair?
The beauty of the ombre style is in a harmonious combination of natural and exclusive hair styles. In other words, such coloring preserves the natural beauty and strength of the hair, but at the same time gives the strands a unique appearance.

Using this type of coloring, you will look attractive due to the revitalization of the strands in accordance with your face shape, individually selected shade and border coloring.
- Brunette hair is a paradise for creating ombre hairstyles. Dark hair color is the basis to which almost any shade of coloring.
- Any bright and juicy colors, which on blond hair sometimes look too contrast, dark-haired girls fit just right.
- You can dye all the ends of the hair, as well as individually selected strands.
- Recently, the coloring of bangs using the ombre technique has also become increasingly popular. This style will revive the hair, to bring a touch of freshness into it, without requiring fundamental changes.

Ombre hair at home: care
The use of sparing dyes when dyeing ombra at home allows you to keep the hair structure.
If we consider that most of the time when dyeing ombra at home, the paint is applied only to the ends, leaving the hair of the root zone in its original form, then only that part of the strands that has been exposed to the brightener and dye can become weakened. In this case, plus staining such as the effect of ombre - natural roots.

- When caring for hair, it remains only to protect them from the harmful effects of natural environmental factors, over-dried air and too frequent styling with the help of a hair dryer, ironing or curling.
- The rest of the care is no different from this procedure for natural hair.
- You can support the hair with masks for your hair type, special balms or serums, and after each wash it is better to apply a special bonding agent to the tips for their smoothness, which prevents fluffing.
- After creating an ombre hairstyle at home with the use of ammonia based dyes, it is worth taking care of the hair more thoroughly, since this color can damage them, making them dry and weak.

- It is worth paying attention to the need for regular haircut tips, as well as the choice of high-quality cosmetics based on natural oils and fruit extracts. These products nourish and moisturize the hair well, so they should be used at least once or twice a week.
- Once a month it is necessary to carry out restorative procedures using various masks or wraps for bleached hair.
Care for your hair will not go unnoticed, as your hairstyle will retain color and shape, and its appearance will be fresh, while your hair - well-groomed and shiny throughout.
Advantages of coloring only the ends
In matters of stylish hair dyeing, ombre, dip dye and balayazh have received deserved world approval. They emphasize the beauty and luxury of hair, give them extra volume and chic.
The advantages of clarifying the tips include:
- Lack of long and painful procedures on alignment of tone and elimination of yellowness. For ombre, many women try to use ginger shades for the effect of sun-faded curls
- Fashionable - partial coloring is now in trend,
- Versatility - such clarification is applied to any hair length, suitable for everyone,
- A rich range of colors - the choice of colors depends on the individual preferences of the client. This technique allows you to make a rainbow of natural colors (black, chestnut, red) or extravagant shades (green, neon or bright pink) on your hair,
- The procedure takes less time and requires less coloring,
- If you do not like the final result, you can trim them, and with full painting you only have to cut your hair well,
- Only chemical ends are exposed to chemical attack.
Types of popular lightening techniques
Among the techniques of lightening the tips of hair, 3 techniques won world fame and popularity:
- Ombre - assumes a smooth stretching of color from dark (main) to lighter (at the tips), for this, at least two other new shades are used. Officially, the ombre technique appeared in 2010. It was first demonstrated by the famous actress of America Sarah Jessica Parker. The idea of painting was taken by stylists from surf lovers, whose curls gradually burned out in the sun and grew, a kind of transition from the main color to the burnt one was obtained. Light curls give a special chic to the technique, the color of the strands “plays”, shimmers. Later, the barbers began to experiment and several affiliated techniques appeared - this is “sombre” (the difference in color between the roots and the tips is different in half a tone) or the coloring of the ends in bright shades.
- Balayazh - not at all a new method of transforming curls. Nowadays, "balayazh" is experiencing a second glory, the first time they learned about it from French stylists back in the 70s. “Balayazh” is very similar to “ombre”, but one additional tone is involved, and they begin to smooth it not along the entire length, but from the middle. For "balayazh" characteristic distinguished individual strands in the face. Stylists note that after such a transformation the face looks younger by at least 5 years.
- Dip dye - an interesting, bright coloring technique for girls up to 20 years. Outwardly, it looks like the tips dipped in paint, no smooth transitions and gradient. The peculiarity of coloring is bright and acrid shades, they give their owners boldness and uncommonness.
Any of these techniques will refresh and emphasize the individuality of the face, will give charm and slight negligence in the hair. Feel like a Hollywood beauty.
How to choose the technique, color and not look "cheap"
Properly selected clarification technique allows you to look spectacular and Hollywood beautiful. But in order not to receive instead of the promised luxury a “cheap” parody, listen to the advice of experienced stylists:
- Fair-haired girls can experiment with all colors, but experts recommend staying on amber or red shades, as Kate Bosworth (Orlando Bloom's girlfriend) did,
- Plum-tips are suitable for brown-haired women, and stylists are advised to brunettes to choose expressive contrasting colors (pink, purple, red) or calm, brown, to brunettes,
- In order for the color on the dark ringlets to look perfect, the hairdresser must conduct a discoloration of the ends and only then apply the chosen tone,
- After staining should not be seen clear transitions of shades - it deprives them of special beauty. Try to make the transition as smooth as possible to achieve harmony and unity in appearance, like on a glossy magazine cover,
- For women with a graduated haircut for short and medium-length strands, it is recommended to use ombre,
- Technique “balayazh”, “ombre” luxurious look on curls, there is an additional feeling of lightness and chic, but girls with perfectly smooth long curls should not be used to avoid looking “cheap” and untidy.
It is possible to dye hair using any of the indicated methods in the salon or at home. Next we will tell in detail how to do it at home.
Before the procedure we recommend to read: Features of clarification depending on the type of hair.
Cooking curls to lighten
Experienced hairdressers recommend regular use of nourishing and revitalizing masks 2 months before the transformation, applying vegetable oils to improve the condition of the strands and prepare them for chemical exposure.
If you decide to make a haircut before painting, then limit yourself to minimal trimming or discard it altogether.
1-2 days before the procedure, do not wash your hair.
We recommend that you familiarize yourself with the features of lightening previously dyed hair.
What you need from the tool
Prepare a tool and items that may be needed in advance, so you do not get distracted by their search. You will need:
- coloring powder and oxidant or ready-made paint for coloring one or several shades, depending on the chosen technique,
- plastic container
- paintbrush or sponge for applying paint,
- comb with rare teeth,
- comb with a sharp tip for easy separation of the strands,
- simple rubber bands, plastic clips,
- foil,
- an old t-shirt, bathrobe or peignoir,
- a pair of gloves.
Making ombre at home
The ombre technique involves the use of several shades that guarantee a smooth transition (overflow) from the root zone to the ends. Home staining is performed in two ways:
Method 1
- Divide the hair into three identical zones: two side and middle. Secure them with rubber bands.
- Paint first the ends of the side parts, then the middle.
- Wrap the colored strands with foil.
- After half an hour, rinse with warm water and shampoo.
- Lightly dry your hair, apply a second coat of paint in the transition area to hide its borders.
- Soak the paint for 10 minutes, then rinse with warm water and shampoo.
Method 2
- Apply a dark shade to the root zone.
- After 10 minutes, distribute the same composition to the middle of the length of the curls, without touching the ends.
- Finally, apply a light paint on the ends.
- Wrap curl tips in foil.
- Soak time specified in the instructions.
- Wash off the paint with warm water and use a shampoo, a balm after dyeing.
Brightening the tips of the hair at home


After the Ombre trend came to us from France, the beauties seriously wondered how to lighten the ends of their hair on their own. A similar procedure offers each salon. Ombre allows you to get a smooth transition from the main color to light without a radical repainting. But you can try to create this effect at home.
Paint selection
Before you begin to brighten the tips, you need to make the right choice of paint for this purpose. It is preferable, of course, the use of funds on a natural basis.
The company L'Oreal produces a special line of colors Ombre, which will help paint the curls in different colors.
It looks like a simple paint, but when it comes to curls it changes their color from dark to light at the ends with a gradual transition.
It’s hard to believe, but those who have tried L'Oreal’s Ombre effect on themselves claim that only paint is capable of that. But the only condition is healthy hair.
In addition, the effect of clarified ends is obtained by applying several means. For this fit any quality paint. Lightening is obtained thanks to the Essential Color tool from Schwarzkopf. The composition of the paint is not ammonia, because there is minimal damage to the hair.
With the proper selection of shades of colors Color & Shine from Garnier you can achieve an interesting result.
And Wella offers over 70 different shades. The Londa line is a bit poorer, but there is no ammonia in its products, they are almost not harmful. Matrix products are great for brightening the ends on dyed hair.
Ombre species
It is worth noting that there are many varieties of popular dyeing techniques with clarified ends. So, ombra happens:
- traditional two-tone. It assumes the use of 2 shades, but the border between them should be fuzzy, the color seems to stretch along the length. In this case, suitable shades close to the native: chestnut, blond,
- traditional upside down. In this case, the hair, on the contrary, lighten near the roots, and darken at the ends,
- vintage ombre The emphasis is on the visibility of regrown hair. Very similar to the traditional, but the face of shades is thinner,
- pony tail. In this case, the hair is lightened in the area of the "horse" tail. Suitable for owners of long curls. If there is a bang, it is lightened entirely,
- transverse ombre. Here there is a transition from a light shade to a dark one very gradually. There is a multitonal variation with a multistage overflow,
- contour framing. This coloring will help to emphasize the shape of the puff haircut,
- Scandinavian ombre. An excellent choice for fair-haired women. Platinum curls flow to the dark color of the tips,
- monochrome Sounds like a Scandinavian variety, but the line must be clear. This is sometimes called the technology of selection of some strands at the tips.
Brighten the ends can be even on short and medium hair. More often, the focus is on highlights at the ends parallel to the parting or in a random order.
Of course, every beauty who wants to move away from the usual techniques of hair dyeing, will find a suitable option for lightening hair.Stylists in salons pick up color, based on many factors. But at home you can make fashionable colors. Even if the attempt fails, you can always align the color.
Brightening the tips in the style of ombra do it yourself
So, to brighten the tips in the technique of ombre is required to choose paint. The stores have in stock special tools for ombre. In addition, you can take the clarifier. It is necessary to carefully read the instructions before use. The paint must be diluted in a glass or plastic bowl. Do not use enamelware! Wear gloves during the painting process:
- Brush on the tips of the coloring agent, taking about 5 cm. Allow the agent to act for 10 minutes and apply again. Here it is important to capture not only the paint ends, but also the area above them,
- thus, in stages, with an interval of 10 minutes, cover the hair zone by zone, climbing higher each time,
- Using a comb with frequent teeth, distribute the product evenly. Wrap hair in foil and hold for a quarter of an hour,
- wash away paint, apply the looking after means.
Remember that with such brightening of the tips, they experience a greater negative effect of paint than with traditional dyeing. If you have too broken and brittle ends, then you should not resort to this method.
Brightening the ends of the hair
The technique of brightening the tips of the hair using the balazhig technique is somewhat different from the ombr. Here comes the effect of the depth of the hair near the roots. This is achieved by the visual volume with a very smooth transition to the clarified ends.
Paint is applied with vertical brush strokes. Here you should not worry that there will not be a smooth transition of tone. This technique is easily performed at home, because it is much easier than it seems:
- if you have a short haircut, then hair should be combed, so that they do not fall off under the weight of the paint, divide them into identical bunches,
- paint each part from the ends without reaching the root by 2-3 cm,
- after 10 minutes, it is required to apply and shade a new layer of product, already a little closer to the base (up to 1 cm should be left),
- after 20 minutes the coloring agent is washed off.
If the hair is medium in length, then instead of combing, collect them in ponytails.
Peroxide Brightening Hair
To lighten your hair with peroxide you will need:
- peroxide solution 3%. You can not use the tool more than 3%, because this will cause damage to the curls,
- tank with a spray,
- clamps
- crest,
- cotton pads,
- towel,
- balm,
- foil,
- hair wash.
- First get ready for the process. You will need safety glasses and gloves to protect against the negative effects of peroxide,
- before using peroxide, wash the ringlets to remove dirt,
- dry with a towel,
- untangle your hair well in order to avoid the formation of nodules. This is important because the shade will be different on them
- fill the container with a spray with a peroxide solution, or dilute it with water in a 1: 1 ratio,
- if you want to lighten several strands, then dip a cotton pad in the tool and lubricate some of the locks. Another option is to spray the solution with a thin layer on top of the hair,
- in order to dye all the hair, divide them into parts, apply the solution to each,
- after the manipulation, leave the tool on the curls for a while to achieve the desired result. The duration depends on the source color and the desired,
- The average duration of the procedure is about 45-60 minutes. After 30 minutes, try washing out some curls and checking the shade. If it fits, then rinse all hair, if not, then wait another quarter of an hour or half an hour,
- after washing off the peroxide, brush the lotion with the balm. This will help regenerate softness and radiance. Balm hold for 30 minutes
- repeat the manipulations until you get the desired shade. Peroxide brightens well curls, but not immediately. Perform new procedures every other day.
- temperature will speed up the clarification process. If the hair is undamaged, use hot air to stimulate coloring.
While the process of peroxide dyeing is in progress, you can go to the sun to enhance the whitening effect. To do this, in the process of finding under UV comb curls. Hair dryer is also suitable for speeding up the procedure. From the strands make a bunch at the top. Wrap in foil, which heat the hair dryer no more than 15 minutes.
To brighten the tips or individual strands, take a solution of 3% peroxide in conjunction with water. Water should be 30% of the total volume of the solution. You can add balm. After creating the solution with a spray spray it on the ends. To get a light shade, you need at least 3 procedures.
Dip Dye Tip Tinting
We all loved to draw pictures with bright colors. Shades of green, purple, blue fascinate. Contrary to the trend of naturalness and naturalness, there is a fashion for coloring tips in the style of Dip Dye. He gives extraordinary fashionistas the opportunity to get a yakrey strands.
Blonde girls are easier to make such a coloring. The color is bright and deep. For dark hair requires a fixer stronger. The painting process can be simplified by bleaching the ends. Of course, every day such a hairstyle is not suitable for everyone, so pastel crayons are invented to create a temporary effect.
This temporary version of painting is that the ends of the hair are dyed with pastels or special crayons. The first washing of hair eliminates this image. Pastel produced in the form of jars with powder. Their use is distinguished by convenience. The strand should be twisted into a braid and painted to the desired length.
Dip Dye effect looks better if you twist your hair. Thus, bright shades play with all colors.
Coloring the tips with food coloring
Curls of different colors can lift your spirits. Bright colors add a festive feeling to any day. But what to do if you want to create a mood right now, and pastels are not at hand? The staining of the tips with food coloring comes to the rescue. This is a harmless analogue of paints Dip Dye. So, it will be required:
- white balm,
- a bowl,
- brush or brush,
- dye.
Mix 100 grams of balsam and 2 packets of dye in a container. Brush the tips or specific curls. In order not to dye too much, pinch your hair high. Another option is to twist the colored strands in foil. After 30 minutes, gently rinse off the dye.
When applying it, remember that there is almost no chemistry in such a dye. Because of this, it is safe for hair. But the causticity has not been canceled, because when it comes into contact with the skin it is difficult to wash it off. To avoid trouble, cover your shoulders and neck with a towel and wear gloves on your hands.
Benefits of Brightening Techniques
Brightening the tips of the hair looks beautiful and stylish, especially if the curls are long. Especially effectively it looks on dark or chestnut strands, attracting the views of others. In addition, partial bleaching has many advantages:
- it can be done with any length of hair, the main thing is to restore the tips in advance, cut off split and brittle,
- You can choose any shades - from natural (light brown, light, copper or chestnut) to exotic colors - blue, green, orange or acid-red,
- any girl will be able to lighten the tips of her hair at home, without resorting to the services of masters in expensive salons,
- the procedure itself does not take much time, it takes only one small package of paint or tonic,
- if desired, you can simply cut the painted areas or restore your color without spoiling all the hair.
Ombre Lightening
Ombre is a smooth stretching of shades from dark to light, at which the transitions are almost invisible to the eye.Lightening tips on this technology involves the use of two or three tones of a similar paint color. Before starting the procedure, it is desirable to restore the strands with the help of nourishing masks, balms, so that after dyeing the ends do not look untidy.
Stepwise application of the dye:
- First, we distribute the entire volume of hair into 3 equal parts, leaving one behind and two on the sides of the head. Each secured with a rubber band or clip.
- After that, we coat the lower zones with dark strands of paint, wrap with foil.
Hold for half an hour, then wash off with shampoo.
The result after completing all the stages will give the strands a fashionable ombre effect, revive the dull hair.
Lightening method balayazh
This option is more often chosen by ladies who care about the appearance of hair, her health and beauty. Before dyeing, you should try to restore weakened locks, applying home or purchased masks, serums, decoctions of herbs for several days in a row.
Before the procedure, at least a day should refrain from washing the head, foil and plastic caps are not recommended. After washing the hair should be dried with a towel without using a hair dryer.
Step by step balayazha:
- We divide the entire mass of hair into parts of unequal thickness, comb it with hair, in order to “stand on end”.
- We retreat from the ends of 3-4 cm, depending on the length, we coat them with paint.
- About 10 minutes after applying a brush, we smear a small amount of paint at the roots.
- After 30 minutes, wash off the remnants of paint with shampoo, dry naturally.
Lightening the tips of the hair with the balayazh technique will make it possible even at home to create a stylish hairstyle that allows you to look younger than this age.
Choice of technology dip dye
This new technique became popular only a couple of years ago, mostly it was chosen by girls younger than 20 years. Lightening dip dye involves blending at the ends of bright, contrasting tones, creating sharp transitions.
First, make the discoloration, then put the selected shade with a brush. It should be done very carefully, otherwise it will not be possible to restore the original color - only trimming the repainted areas will help.
The second option is much easier to perform - in a container with a solution just dipped curls to the desired length, and then dried naturally.
The use of folk methods for clarification
Those who are afraid to use chemical compounds and oxidants can be used for bleaching the ends of proven national methods. Good effect gives the use of cinnamon, lemon juice, honey, kefir, chamomile infusion.
- Mask with kefir, cinnamon and honey. We take all the products in the same proportions (for example, 2 spoons), mix thoroughly. Distribute the mixture to the desired length, hold for an hour. After rinsing, rinse with lemon water. Repeat the procedure 5-6 times a day.
- Rinse with lemon and cinnamon. Take these ingredients in a tablespoon, stir in 500 ml of water. Rinse the ends daily for 7-10 days.
- Infusion of glycerin and chamomile flowers. Pour a couple of spoons of pharmaceutical chamomile 200 ml of boiling water, insist. After cooling, filter, pour in 2 tablespoons of glycerin. Apply to the ends, after an hour just wash off with water. In addition to the brightening effect, the mixture will help restore the lost shine and elasticity of the curls.
Which method or home method of bleaching to choose depends only on the length of the hair, personal preferences and skills. In all cases, the hairstyle will look stylish, youth, will give the strands a shine and a spectacular appearance. For the first time when performing an ombra, balasteer or dip dye, it is better to take a girlfriend as an assistant in order to achieve a uniform, uniform color transition.
Creating a fashionable ombre at home: 6 tips and technicians from professionals


Author Oksana Knopa date May 28, 2016
Coloring ombre gained popularity several years ago and still remains one of the most important trends that even famous celebrities maintain.
Fashion stylists assure: this technology of coloring will suit absolutely all girls, regardless of age, color type or face shape.
In addition, the effect of burnt strands will attract attention with any styling, from natural curls to complex hairstyles with braids.
Such coloring looks very natural and will be an excellent choice for those who do not decide on radical changes, but want to emphasize their natural beauty. The dyeing process does not require much effort, so you can make an ombre at home, the main thing is to choose the right paint for your hair type.
Ombre can be done at home, the main thing is to know all the nuances
What is the best way to brighten the ends of hair?

It is no secret that many women love to experiment with their appearance, especially with regard to hair color. But frequent staining can harm their structure. In order to refresh your image, it is not necessary to repaint the entire head of hair completely, just lighten the tips or even a few strands.
Technique lightening tips of hair
Today is a very popular method of staining. Many stars have not done an ombre for a single season. Its essence lies in a smooth transition from dark roots to bright ends.
It is better to entrust the clarification of the curl ends according to the ombre technique. This is a very complicated staining method.
Another popular dyeing technique is to brighten the tips. Immediately before lightening, do not be lazy to make a haircut and cut off the split ends.
Clarification procedure:
- Well comb your hair so that it does not tangle.
- Divide the strands into four parts: the lower, upper and temporal-side parts. Secure them with clips.
- Separate one small strand and put a foil under it.
- Apply to the ends of the hair brightening composition.
- Dye the entire bottom of the hair in this way, then go on to the next.
- Soak the dye on the hair for a specified time. It is usually about 30 minutes. Then rinse hair thoroughly under running warm water with shampoo.
- After that, apply a nourishing mask or balm on the curls. It is desirable that it be designed specifically for dyed or bleached hair.
Popular professional hair lightening products
This tool can lighten dark hair for 6-7 tones without yellowness, while the harmful effects on hair is minimal. Essential oils and collagen contained in the paint soften the chemical effect.
The paint is very easy to use. It gently bleaches the hair, giving it a cool shade of blond and natural shine.
It is from the leading colors for bleaching. For home use developed a series of ammonia. Perfectly paints over gray hair. The effect after staining persists for a long time.
Able to lighten dark hair by 7 tones. The paint is quite aggressive, so before applying carefully read the instructions. An undesirable yellow tint may appear. Supra is ordinary and professional.
The difference is that a professional is sold without an oxidizing agent, with the aim of allowing the master to select the required percentage of oxygen.
Perfectly copes with its task, without leaving a yellow shade. When used correctly, damage to the curls is insignificant.
In the Estelle line of bleaching products there are: a lightening cream paint, micro-granulated powder and paste WHITETOUCH.
Folk remedies for lightening hair
With the help of homemade products, you will not achieve a dramatic change in hair color.It is quite possible to lighten the curls by 2-3 tones lighter. Moreover, such clarification is absolutely harmless. Natural ingredients improve the condition of the hair, smooth the structure and add shine.
With the help of honey, you can lighten hair by 1 tone in one session. To do this, it must be kept on the hair for at least 8 hours. Honey gives curls a golden hue, as well as smoothness and silkiness.
You can lighten your hair with it, regularly rinsing them with water and lemon juice. Curls get a platinum shade. Also, lemon contributes to faster hair burning in the sun. But, you should avoid high concentrations of lemon juice, as this can lead to fragility and dryness of the curls.
A decoction of chamomile can lighten hair by 1-2 tones. At the same time strengthen them and give shine. But this option is not suitable for girls who want to get rid of yellowness.
Cinnamon works best on natural hair. It can lighten up to 2-3 tones. If the curls were previously painted, then thanks to this mask the color will become less saturated.
To prepare the mask with cinnamon can not use metal utensils.
A mixture of glycerin with chamomile tincture can lighten hair by 1 ton after the first use. To do this, it is necessary to sustain the mask on the curls for 40 minutes.
Kefir mask
For the procedure you will need:
- kefir-0.5 l.,
- salt-1-1.5 tsp.,
- vegetable oil-1 tbsp. l
Mode of application:
- Mix all ingredients thoroughly until smooth.
- Half of the resulting mixture is applied to the part of the hair that you want to lighten.
- Wear a shower cap on your head.
- Soak for 1 hour, then rinse hair.
- Repeat the procedure using the second half of the composition.
Soda mask
Ingredients Required:
Mode of application:
- All ingredients mix.
- Apply the composition to the ends of the hair.
- Hold the mask on the hair for 40 minutes.
- Rinse the hair with plenty of water.
Contraindication: very dry hair.
Ombre dark hair dyeing with photo and video


Rating: Not rated
In the entire history of hairdressing, countless ways of changing hair color have been invented.
Ombre, which we are going to talk about - one of the most popular hair coloring methods allowing you to give your hair a zest and originality.
The basic principles of the ombre technique
Ombre is a shadow staining technique. Thanks to her, a smooth flow of color from one shade to another is performed on the hair. As a rule, this is a transition from darker roots to light-colored hair. The exception is a contrast ombre, in which there is no smoothness in the transition of color.
It looks most advantageous on the hair of various dark shades and red curls. Thanks to the combination of tones, the effect of beautifully sun-baked hair ends is created. Blondes are more suitable option reverse ombre, in which the ends of the hair is darker, and the root zone of the hair is bright.
Reverse ombre
This option is best suited for girls with blond hair of various shades - light blond, ashen, light red. The ends of the hair are darkened when performing the reverse ombre, while the root zone is lighter by several tones. Ombre reverse technique allows you to visually increase the volume of the hair and give them the intensity of color.
How to make an ombra on dark straight hair at home
In order to make an ombre yourself, you must at least have skills in coloring, otherwise you risk getting unpredictable results. But still, if you decide, you will need:
- clarifier,
- hair color of the tone that you chose to ombra,
- tanks for breeding paints,
- hairdresser brush,
- clamps to separate the strands.
The entire tool for use in the dyeing process should not be metallic.
Ombre magic technique - your stylish hair coloring
Not everyone can cope with pieces of foil in order to properly dye their hair using this or that technique. Therefore, the secret that the ombre technique implies is to lay hair strands on a flat surface (for example, a table). This revolutionary technique is now being mastered by hairdressers and stylists. For more complex staining, various cones, balls, arcs, and other strange things are used.
Revolutionary hair coloring
When you have decided on a range of shades for hair, you can proceed. The main condition: you have to sit comfortably, as it will take a long time to sit in one position, about an hour. The hair is laid out on the surface of individual strands, pre-separated. And these strands resemble a canvas on which the master will create like an artist.

First, the ends of the hair are carefully colored and smoothly, like throws, the border between the light and dark hair color is smoothed. Upon completion, selective strands are stained, some of them are dyed, departing from the hair roots about 3-4 cm, thus observing the contouring of the hair.

The ombre technique is performed on long thick hair as well as on hair with a haircut. Different options look gorgeous and many of them will certainly be interesting for you.
Stage One - Clarification
First, according to the instructions, dilute the lightening paint. Then divide the hair into several zones or strands. Their number depends on your desire, usually the best is six or eight parts.
Apply a lightening paint to each strand with a hairdresser's brush, moving from the ends of the hair up to the place that you defined as the border for the ombre.
Stage two - lightening correction
After you have processed all the tips, we maintain the brightener for five minutes. After five minutes, a hairdresser with a brush or a comb with frequent teeth pull the clarifier a few centimeters up the curl. You can repeat the procedure twice.
This is done in order to achieve the most smooth color transition along the strand. That is, the exposure time of the brightener will be longer at the tips and shorter when approaching the ombre border, as a result of which the ends of the hair will later become more intensely colored.
Paint and clarifier are prepared immediately before use - they can not be stored.
What is ombre staining

From French ombre (ombre hair) is translated as shading - it is hair coloring, implying dark roots and light ends. Strands change their tone over the entire length. The roots themselves are not stained. It seems that the tips have grown strongly, but the transition from one shade to another is even.
Ombre hair coloring has its advantages:
- Preservation of a natural shade and a natural type of hair.
- Using the ombre, you can change the visual shape of the face. If the facial hair is brightened by several shades, the rounded shape can be visually lengthened.
- The colored tips will add volume to the hairstyle.
- This technology of dyeing does not require additional manipulations in the morning to make a way. The hairstyle itself looks stylish.
- You can choose any suitable shade according to the tone and type of your own hair.
 How to restore dry hair ends? Learn effective methods.
Read more about long-term hair curling in this article.
Popular species
There are several options for staining this technique, most of which can be applied at home.
Classic - dual-tone hair coloring with a gradual transition of tones. For her apply mainly shades close to natural (chocolate, light brown, amber, wheat).
Reverse ombre different from the previous arrangement of colors. The tips are of a dark shade, and the root zone is lighter.
Pony tail ("horse tail") Very suitable for owners of long hair who love to collect hair in the tail. Strands are painted to the level of gum.It turns out the effect of sun-bleached hair. In the presence of bangs, it is also painted.
Sharp ombre performed in such a way that there are clear transitions between colors.
Color staining implies the use of different colors. For this, in addition to dye, food coloring and mascara can be used.
When dyeing dark hair there are difficulties with the selection of color. For owners of their own black color, you can use golden, cognac, red tones.
Stage Three - Coloring
After you have clarified the ends, rinse them with warm water and shampoo, towel dry and apply pre-cooked paint on the clarified areas. Soak in time according to the instructions, wash off the dye with shampoo, apply a balm and finally rinse the hair. Your ombre is done.
Precautionary measures
- In order to achieve the desired result, an ombre is best done in a good hairdresser or salon, because even an experienced master cannot always guess the final hue of the shade that will work on your hair,
- if you have dry or exhausted hair with split ends, do not overdo it with the brightener - it can damage the hair structure even more,
- any chemical dye can cause an allergic reaction, so you must first make a test for sensitivity.
Several of our readers, who in practice used the ombra staining technique, shared their impressions, photos and reviews.
Evgenia, 27 years old:
Photo ombre on dark hair, hair caret.
Expert commentary: In order to get a sharper transition on the border of shades, Eugenia should have used foil at the coloring stage. If the foil is not used, it turns out a smoother flow of one tone to another.
Anastasia, 30 years old:
Photo coloring ombre on dark hair.
Expert commentary: Anastasia has turned out to be an almost perfect version of the classic ombre on dark hair. Shades smoothly and beautifully into each other.
The only thing that can be advised is not to forget about careful care of curls after dyeing, the use of special balms and conditioners for colored hair.
This will help keep the result longer and will benefit your hair.
Olga, 25 years old:
Expert commentary: It is always necessary to carefully read the instructions of the clarifier and the paint, adhering to all the recommendations with accuracy, including those relating to the time of exposure to paint. Otherwise, you risk burning your hair and getting an unpredictable dyeing result.
Video on how to make an ombra on dark hair. Detailed description of the painting technique. Option classic ombre.
What do you think - is the ombr staining technique worthy of attention or not? If you have already managed to apply it - share with us your impressions and results.
Technique performance at home

The effect of ombre on the hair can look harmoniously on almost any woman. Only with very short haircuts it is not desirable to do it. For the length of hair, starting from the level of the chin, it is possible to carry out the staining procedure without leaving the house.
To paint yourself, you need to take an ombra paint a few tones lighter than your natural hair color (4-6). Least of all the difficulties will be with paint-mousse.
How to make an ombre? For the procedure will require:
- gloves,
- Ceramic bowl
- hairbrush,
- paint brush
- foil and clips for her,
- rubber bands
- shampoo and hair conditioner.
To dye your hair, you must first mix the coloring composition well, determine the placement of the border of the transition tones.
Comb the hair and for more convenient application of paint divide them into 3 parts - from root to tip. Apply paint to the lower third of the separated hair, wrap it in foil, fasten with clips.
Then apply the composition to the curls, starting from the middle, moving to the tips. To make the transition more smooth, you do not need to paint very smoothly. Everything is done quickly so that the coloring occurs evenly. First, paint paint front curls, then - back. The holding time of paint on the tips in the region of 20 minutes. It all depends on what result is needed at the output.
After a specified time, paint is applied to the second third of the length of the strands; they must also be wrapped with foil. On these 2/3 hair dye you need to keep another 5 minutes. After that, the composition is washed off.
 Learn all about the use and benefits of cinnamon for hair.
Original photos of thresh haircuts look on this page.
At http://jvolosy.com/uhod/vitaminy/komplivit-siyanie.html read the instructions for use of vitamin Komlivit Shine for hair.
If desired, even more brighten the ends, the remnants of the coloring composition can be applied for another 10 minutes, wrapped with foil. You can do it in another way: when you first paint for 5 minutes longer, keep the paint.
To achieve the effect of a smooth transition when painting at home, the procedure should be done with a thin brush. Swabs should be vertical. You can conduct experiments with shades of colors. Several tones from one palette are taken, which are several tones lighter from one another. In this case, the application can be carried out simultaneously on all hair. Lighter tones will go to the tips, dark ones will go to the middle. But it is better at home to resort to technology, implying "waiting".
Expert advice

If the home ombre stains for the first time, then you should learn a few rules that will help keep your hair healthy and not spoil the result.
Before the procedure, it is desirable to improve the hair, take a firming course. Each painting drains strands, deprives of moisture, no matter how gentle it is. Therefore, after each shampooing, you need to make a nourishing mask on the strands. Roots are not required to process. Rinse off after 5 minutes. Well affect the curls of vegetable oils (burdock, linseed, argan). It is useful to rinse the hair with decoctions of herbs (nettle, burdock root, oak bark).
Before painting, it is desirable to have a haircut, slightly profile the tips. On the damaged hair ombra will not look very natural.
Care should be taken when carrying ombra on short hair. You can limit the lightening most of the length of the strands. To make the transition smooth and not conspicuous, you first need to lighten the tips a little more.
After the procedure for some time you can not use curling iron, hair dryer or iron. From this, the hair will experience an additional undesirable load.
If you experiment with your hair terribly, afraid to spoil the appearance, you can paint only the ends. If the result is not satisfactory, they can be easily cut off. We must not forget to trim them once a month to refresh the hairstyle, removing damaged hair. And do not forget about grooming masks, dyed hair need them at least once a week.
Video. Visual ombre staining technique itself:
Like this article? Subscribe to site updates via RSS, or stay tuned to Vkontakte, Odnoklassniki, Facebook, Twitter or Google Plus.
Subscribe to email updates:
Tell your friends!
3 COMMENTS
Interesting article. I have long wanted to try to make such beauty at home. At home, because it is more profitable in time, there is no need to go anywhere and you can do it at any convenient time. So, I'm already running to the store for a thin brush, a restoring mask and a new husband))) After all, soon I will be on top!
I have long wanted to try this dyeing style, but there is no money for salon dyeing, as the hair is long and thick, the paint consumption will be huge, and it’s very high there. I looked at your tips and lessons with my friend
good helpful article. I want to try this dyeing style, but there is no money for salon dyeing, as the hair is long and thick, the paint consumption will be huge, and they have it there very expensive. I looked at your tips and lessons with my friend and decided to experiment. The result exceeded all our expectations. super effect. thanks a lot. Now it’s my turn to paint a girlfriend. Tomorrow I'll go paint